
- [email protected]
- +372 6188005
MED17/EDC17 Module
Main features:
- Support for units with Immo version 4 and 5.
- Editing all Immo data in its EEPROM.
- Possibility to disable Immo and change the status for units with Immo 4 and change the status for units with Immo 5.
- Export and import of data, including from other units (for example, Passat CCM comfort unit)
- Cloning of unit for Immo 4 and 5.
- Import of Immo 4 data from third-party program data files: VVDI, SMOK, CARPROG and immobilizer 5 from VVDI
Working with the Module
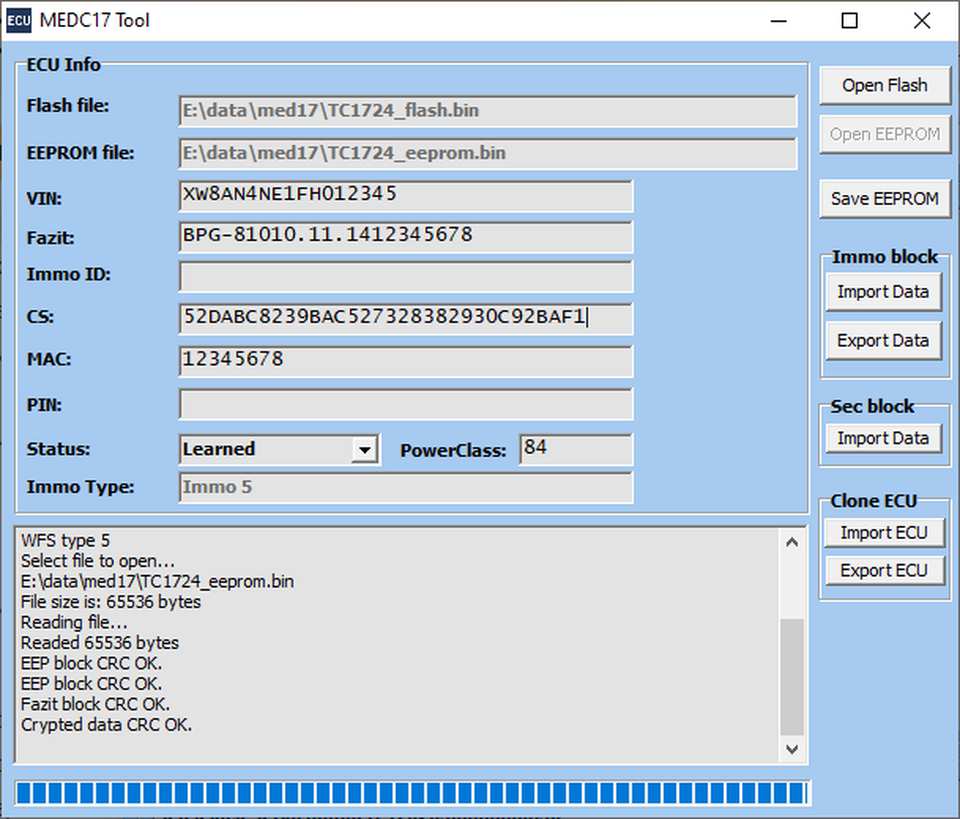
To begin working, you need to upload the flash and EEPROM files. The upload is done sequentially by pressing the “Open Flash” and “Open EEPROM” buttons. During the file upload, a check is performed to ensure their acceptable sizes. Additional information will be displayed in the lower information window: sizes of the uploaded files, type of immobilizer, and the state of the immobilizer data.
Once these data are successfully uploaded, you can start working with the immobilizer data.
For ECUs with Immobilizer 4, the module allows you to modify the following data: Fazit, VIN, Immo ID, CS, MAC, PIN, as well as change the immobilizer status.
The following statuses are available:
- Not Learned,
- Learned,
- Immo Off.
For ECUs with Immobilizer 5, the module allows you to modify the following data: Fazit, VIN, CS, MAC, PowerClass, and also change the immobilizer status. The following statuses are available: Not Learned, Learned, Bad Learned.
Editing immobilizer data can be done manually, as well as by copying values into the corresponding fields.
For cloning and binding ECUs, it is more convenient to use the service functions:
Immo block – Import Data, Export Data and Sec block – Import Data.
Immo block – Export Data: When this button is pressed, the accuracy of the entered data is checked, and then all necessary immobilizer data for cloning the ECU is exported. The resulting export file can be used in all ECUs with the corresponding immobilizer version (for example, MED9.1.1).
Immo block – Import Data: When this button is pressed, all necessary immobilizer data for cloning the ECU is imported. A version check is performed to ensure that the immobilizer data from the imported file matches the version of the immobilizer data in the current ECU.
Sec block – Import Data: When this button is pressed, all necessary immobilizer data for cloning the ECU is imported from data files of third-party programs: VVDI, SMOK, CARPROG. For ECUs with immobilizer version 5, support for converting CS from 12-byte format to 16-byte format is available.
Clone ECU – Export ECU: When this button is pressed, the entire encrypted block of immobilizer data is exported. This functionality can be used when re-encrypting EEPROM data for another processor.
Clone ECU – Import ECU: When this button is pressed, the entire encrypted block of immobilizer data is imported. This functionality can be used when re-encrypting EEPROM data for another processor.
After making changes, you can save the data by pressing the “Save EEPROM” button. A check is performed to ensure the accuracy of the entered data.
Notes:
For proper processing of immobilizer data, it is necessary to use the flash and EEPROM from the same ECU. Otherwise, incorrect data decoding will occur. When cloning the ECU block, it’s essential to consider that the flash contains data with the vendor ID and power class. If these do not match between the original block and the cloned one, the block will not pass immobilizer authorization. Verification and modification of this data can be performed in a separate module.
When changing the power class, it’s important to note that it is also present in the flash. If there is a mismatch between the power class in the EEPROM and the flash, the block will not pass immobilizer authorization. Verification and modification can be carried out in a separate module.
When importing immobilizer data from an external file, it should be noted that the import is only possible if the immobilizer version in the ECU matches that in the imported file. For example, if the ECU’s immobilizer version is 5 and the version in the imported file is 4, data import will not be possible.